Create an ownership recipe with Microsoft Teams, Planner Tasks & Power Automate
Have you ever pinged someone in Teams with a quick request, only to find that it’s been forgotten about? Or worse, you forgot to ask in the first place?
Like most remote companies, here at Tikit we spend a lot of the day collaborating in Microsoft Teams, sharing ideas, asking questions or requesting help with different activities or challenges that arise. Of course, we use Tikit for conversational ticketing and internal request management, but occasionally little requests slip through this gap and become direct messages or conversations in Microsoft Teams. This process will help you stay on top of things more efficiently.
Ingredients
- Microsoft Teams: where the request originates.
- Tasks by Planner: Kan Ban-style board to track progress and ownership.
- Power Automate: a workflow engine that “…provides a user-friendly and focused experience within Office 365 that can easily get end-users going once they are assigned an appropriate license.”
Method – Request
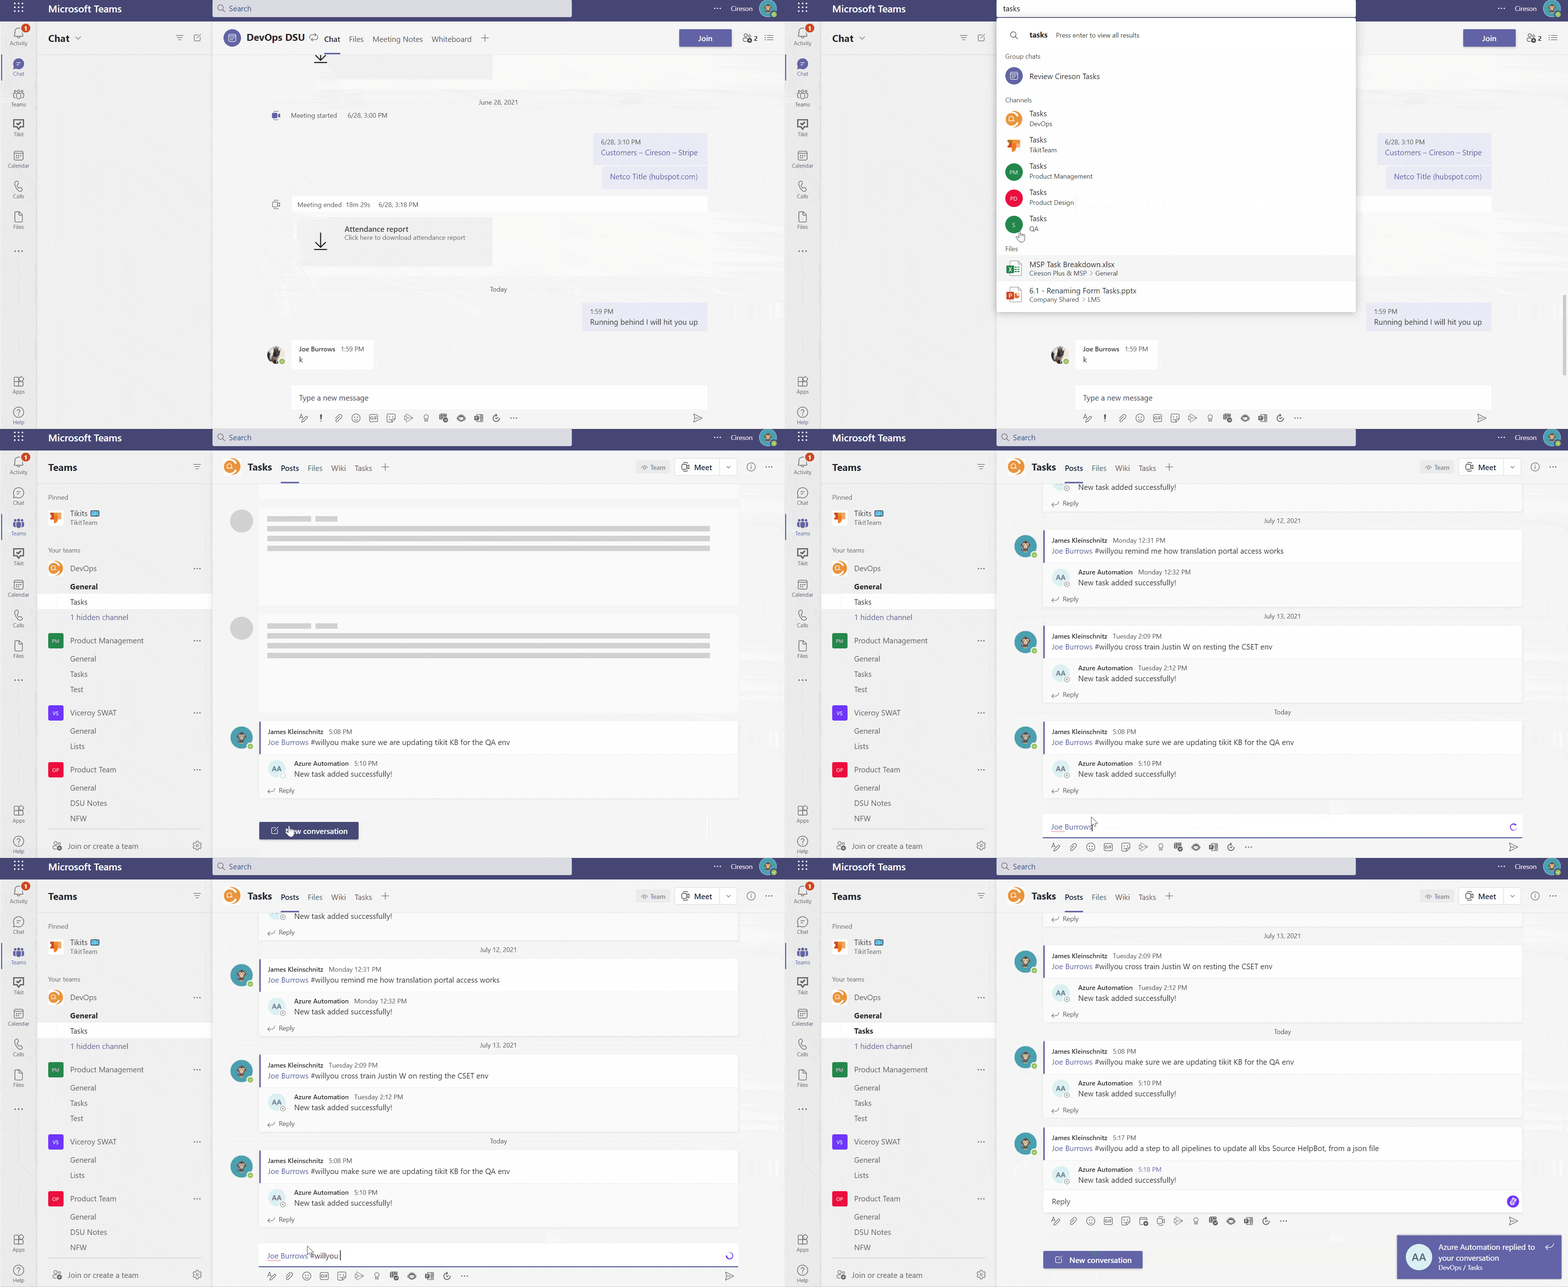
In this example, we have created a channel for the DevOps department called ‘Tasks.’ This channel will be used to @ mention a DevOps team member followed by the #WillYou, which will use the body of the messaged request created as a task. We also wanted the optional #by hashtag to be able to set a due date on the task.
1. Create a channel in Teams called Tasks.

2. Add a tab to the newly-created channel for “Tasks by Planner” and name the tab ‘Tasks.’

3. From Power Automate, create a new flow called #WillYou DevOps (or whatever department you are creating this process around).

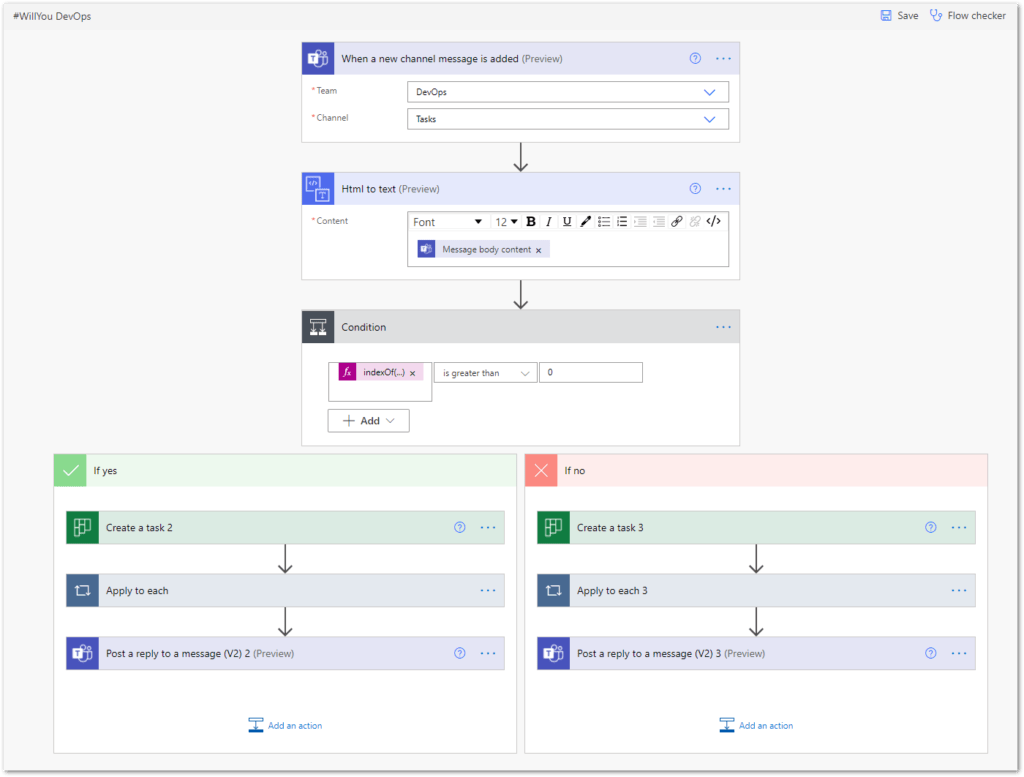
4. Within the Flow editor, we want to create a trigger followed by 8 actions.
- Add a new Teams trigger of “When a new channel message is added.” Select the team and newly-created channel.

- Add an Action step for “HTML to Text” and insert dynamic content from our trigger “Message body content.”


- Add an Action step for “IF condition.” We are using this to separate different flows depending on if #by exists in the message. Here we are going to use the expression indexOf to return the first occurrence of a string from our previous step ‘Html_to_text’ – indexOf(body(‘Html_to_text’), ‘#by’)

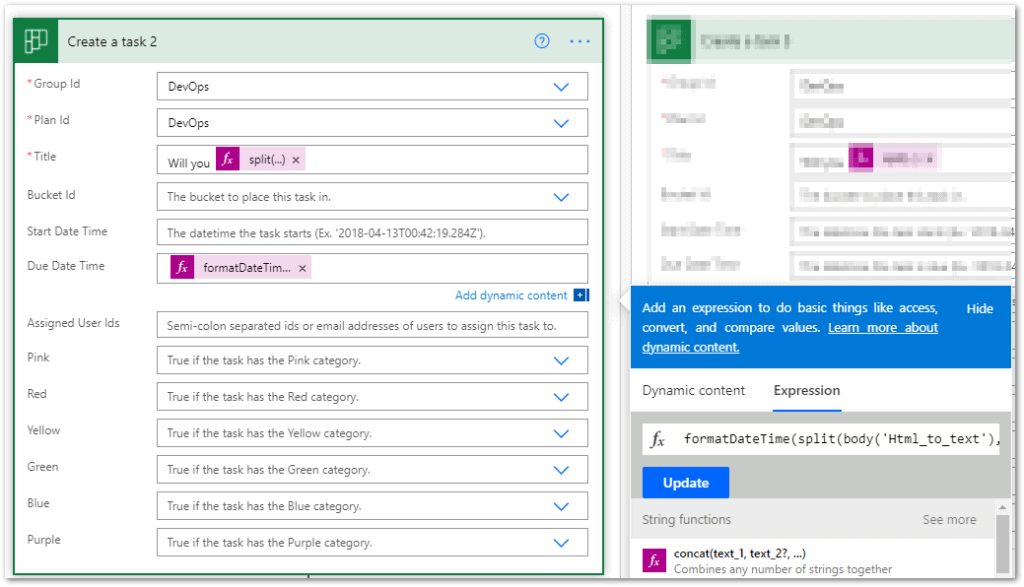
- Under ‘If Yes’ Add an Planner action step for ‘Create a task’ and select the group id and plan of ‘DevOps.’ On the action, we will set a Title of – ‘Will you,’ followed by a split expression to get the second part of the string from the ‘Html_to_text’ task split(body(‘Html_to_text’), ‘#willyou’)[1]
We also want to use the formateDateTime expression to set the tasks due date from the ‘html_to_text’ task formatDateTime(split(body(‘Html_to_text’), ‘#by’)[1], ‘MM-dd-yyyy’)
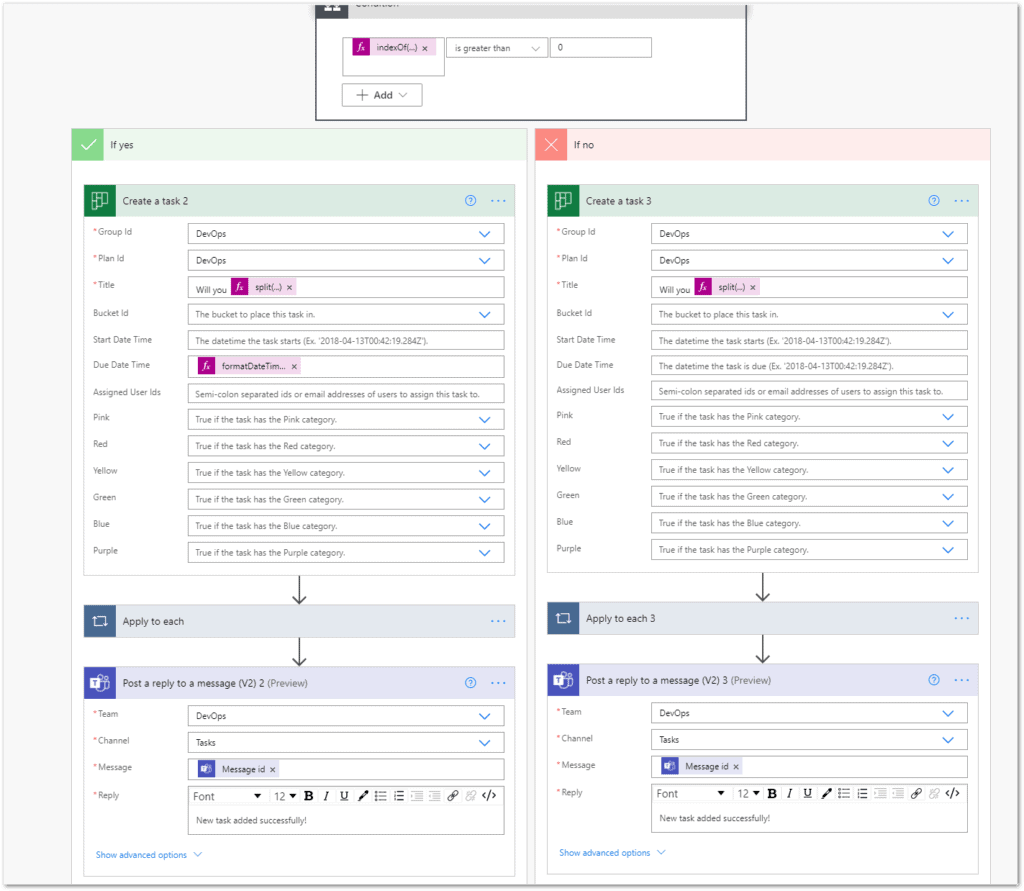
- Add Teams action ‘Post to a message’ and subscribe to the dynamic content Message id from the Teams trigger.

- Repeat the above two steps for the other branch without the ‘Due Date time.’
5. Review steps and test.
- View all actions on Flow.
- Create a message in the Tasks channel @mentioning a team member followed by the #WillYou hashtag.

- Confirm the flow triggers (this can sometimes take a minute or two), and that a task gets created in Planner.


Method – Manager Approval
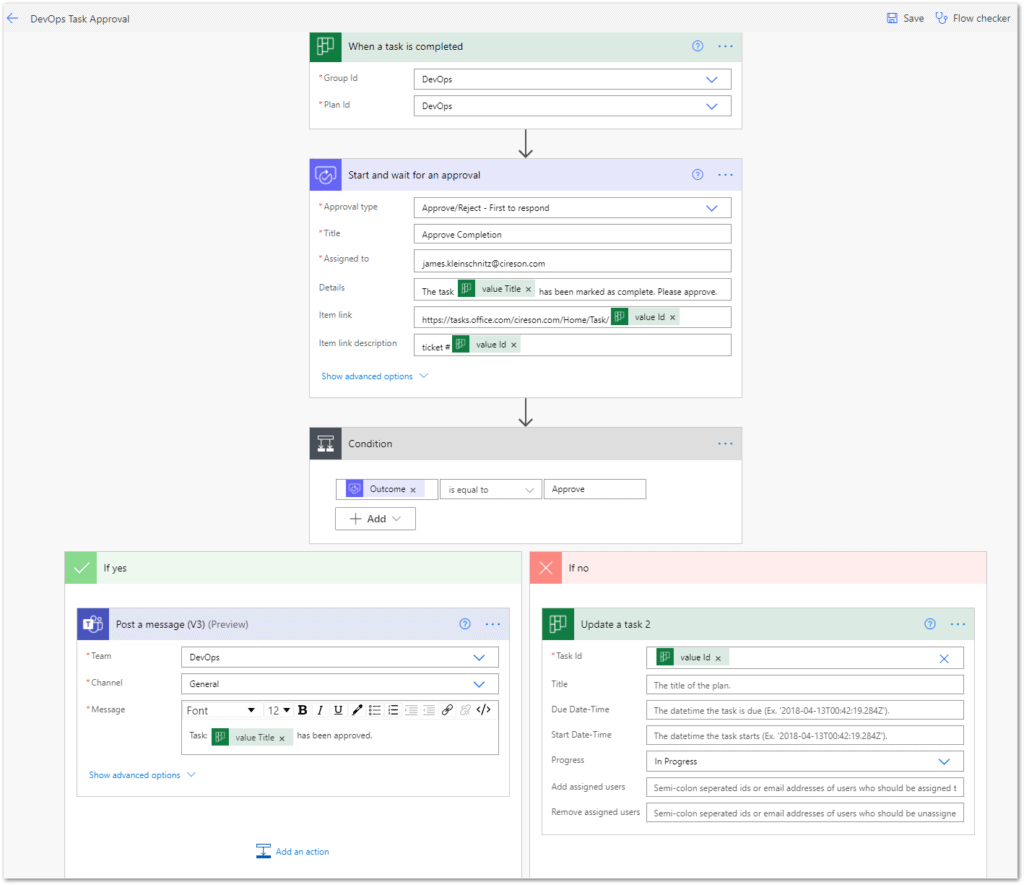
Finally, we wanted visibility and final approval of requests to be routed via the DevOps manager, so we created another flow to complement the completion of the Planner task.
1. Create a new flow called “DevOps Task Approval.”

2. Within the Flow editor, add a trigger and 4 actions.
- Add a new Planner trigger for “When a task is completed,’ targeting our DevOps group and plan ID created earlier.

- Add an Approval Action step “Start and wait for an approval,” assigning the approver to the manger of your department. Subscribe to the dynamic content from our trigger for Title and ID.

- Add a Condition Action step for “If condition,” based on if the outcome from the approval task equals Approve.

- Under ‘If Yes,’ add Teams “Post a message.” This will post a message to the general channel in the DevOps team that the task has been approved. Subscribe to the dynamic content of the title from the trigger stage.

- Under ‘If No,” add an update task to change the status from completed back to in-progress, subscribing to the dynamic content ID from the trigger stage.

3. Review steps and test.
- View all actions on flow.
- Complete the task in Planner.

- Confirm approval and flow execution.

If you have any questions on the above flow or inspiration for other ideas – let us know!
For getting started with Power Automate, I’d recommend reviewing Microsoft’s Power Automate Learning Resources and Power Automate documentation.
Happy Power Automating!


